
Updating the operating system on a Cisco device sounds like a daunting task, but once you understand what the process involves you will not fear the process at all. This is the situation I found myself recently, I was blessed to have been given some Cisco equipment to start building out my new home lab. I am work on a post about that as well, so stay tuned!
There are a few different ways to accomplish this task actually and I am going to share the method that I choose. The most common options people use are SCP (Secure Copy Protocol), FTP (File Transfer Protocol), and TFTP (Trivial File Transfer Protocol). I decided to use the TFTP method for no real reason. Let’s see what it takes to get these devices updated!
Environment:
- 2 @ Cisco 2960 switch
- 4 @ Cisco 3750 switch
- 3 @ Cisco 1921 router
- 1 @ Windows 2019 server VM (TFTP server)
- 1 @ Dell PC (console access to devices)
- 1 @ Mac Book Pro (Admin machine)
I am using a single subnet of 10.0.31.0/24 for the management of my home lab. The TFTP server is on that same subnet (10.0.31.2). I have a UniFi Dream Machine Pro as my home network router (10.0.31.1). My process was to connect each device to the UDM and then console into it with the Dell PC using putty.
Getting the Images:
You will need to have licensed images for this. I have purchased a personal CML license directly from Cisco to get access to different platforms. With that you get access to the following images:
- IOSv and IOSvL2
- NX-OSv and NX-OS 9000v
- IOS XRv and IOS XRv 9000
- IOS XE (CSR 1000v)
- ASAv
With this license I could download images directly as well. You can do that by going to the Downloads page and search for the images you want. When you hoover over a file you get a pop-up box with some information about the file, which looks like the image below.
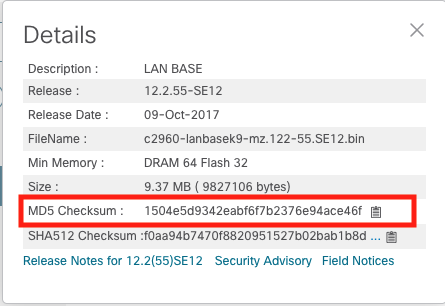
I have highlighted the MD5 checksum information, you can use that to verify if your download is secure and has not been tampered with. I downloaded the file directly to my MBP and in the terminal you type, md5 {File path}, this command will run the file through md5 hashing and give you the value to compare to the downloads sight. As you can see the has is the same meaning our download is secure.

Setting up TFTP server:
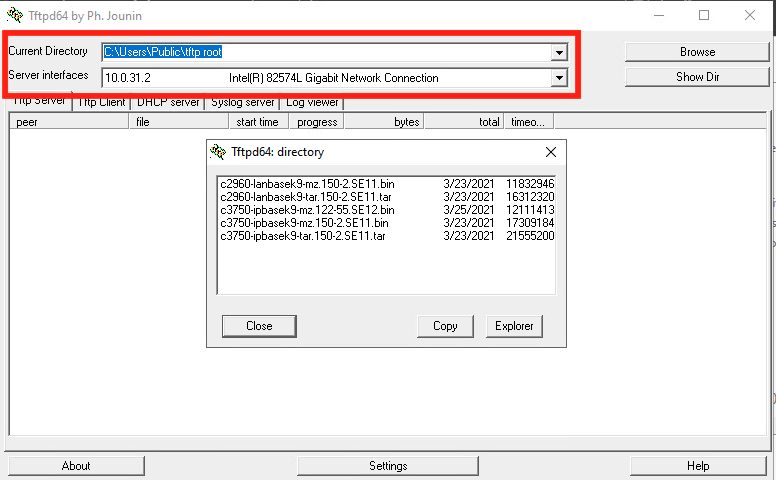
I choose to use the TFTP protocol to transfer my downloaded images to my devices. TFTP is an unsecure protocol, meaning it does not support authentication or encryption, but it is great for use in a lab environment. I decided to use the open-source software called TFTPD64, it’s a great little TFTP server software. You can find it here. You must specify the folder location of your images and the network adaptor to use within the UI and then we are ready to start the transfer.
Moving the files to the device:
I plug the device into my UDM on the specified port and the switches are set to use DHCP and will get an address assigned by the UDM. I then connect to the console of the device and use PUTTY to access the device. There are two ways to accomplish this transfer. You can fully specify the information needed in a single command or use a generic statement and be prompted for the information. Let’s see both in action!

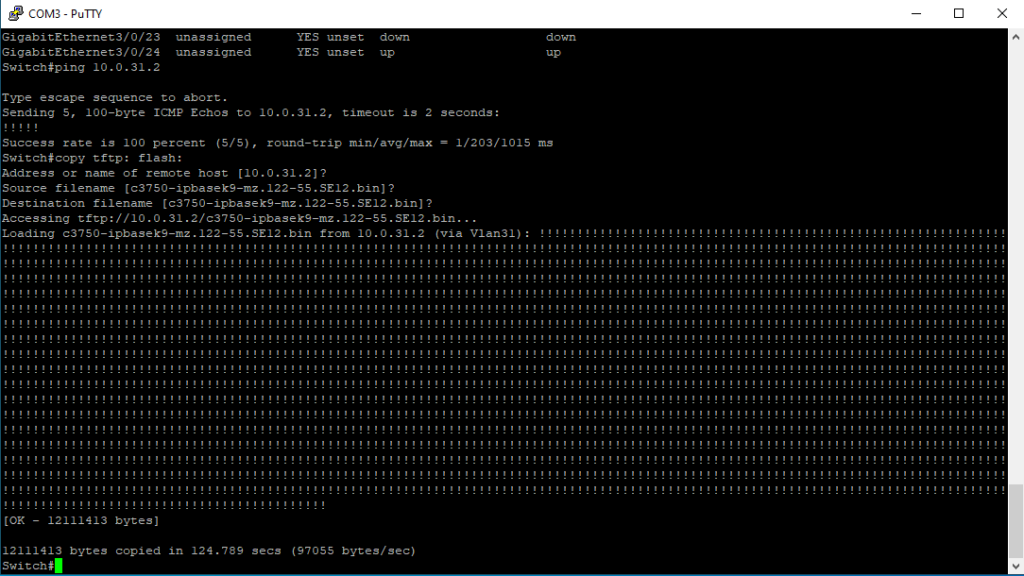
In this process we first tested connectivity to our TFTP server with a ping. We then used the copy command with all the specified information need. So, the command ended up being:
copy tftp://{IP address of the TFTP server} / {file name} flash:
We are then prompted for the name of the destination file; the system will use the name provided as seen in the name between the brackets []. If this is the desired file name, you can simply press enter or specify the name you desire. Once you specify the destination filename the transfer begins.
The other way to initiate a transfer is to use the command: copy tftp: flash:
With this method the system will prompt you for the address of the TFTP server, source file name, destination file name in the same manner as before. The information in between the brackets is default and can be accepted by selecting enter. Or you can specify a new value and then select enter.
Once the transfer begins you will see you should see the following on your TFTP server:
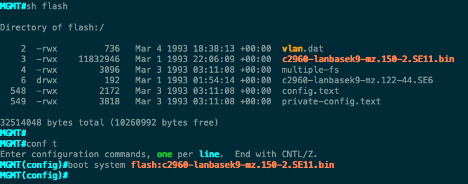
Once the file transfer is complete the file is now in our flash memory on the device, and you can verify that with the command: show flash
Now we want to tell the device which file to boot from, so we get into global configuration mode and use the command: boot system flash:{file name}
Now we need to reload the device, for this we use the command: reload
The system prompts us to make sure that is what we wanted to do, we type yes and then press enter to proceed with the reload.

We can now confirm which version the device is running with the command: show version

Conclusion:
In this article I have shown you how to upgrade a Cisco device through TFTP. We have also covered how to verify the MD5 checksum on the image to make sure we have a secure file. Now that you have seen the process, there is no need to be fearful of how to accomplish this task. Thank you for stopping by and hope this has been informative for you!