Part of the fun of learning a new technology is spending time getting deeper knowledge of the technology. I was wanting to send a file from one host to another in my home lab and I thought that I should do a packet capture to “see” what this looked like going over the network. Being able to troubleshoot at the packet level is something I am striving to be better at. Wireshark is such a valuable tool for the network engineer these days. I was able to identify something that I thought was out of the ordinary during the capture and it was a great learning experience! I am going to share my process with you all in the following article.
The Setup
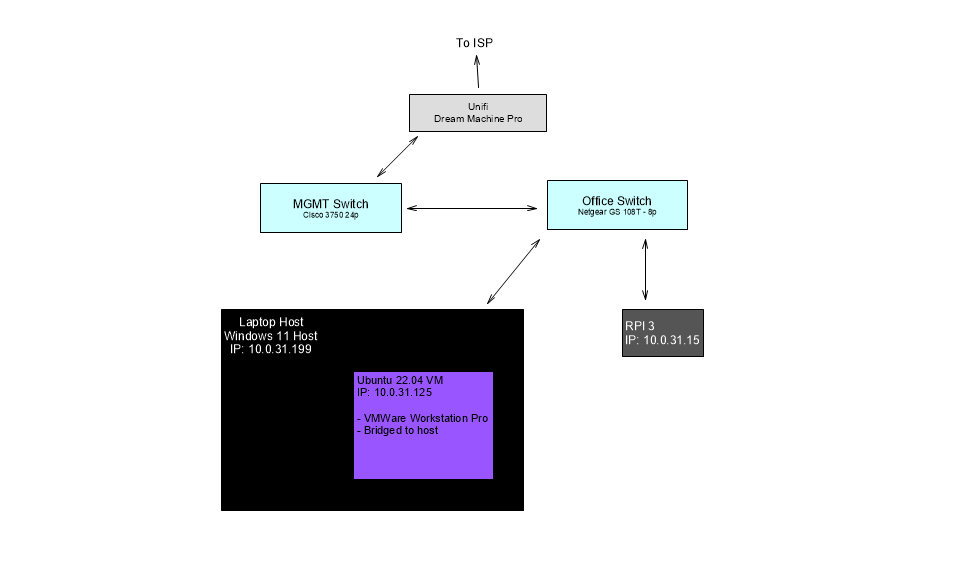
As you will see in the topology, it was a simple transfer of a python script from my development VM to my RPI. I was working on a script to notify me when the International Space Station was over head. It was an exercise in API interaction with python, I love to learn new things! Anyway, so I wanted to use a method to send the files over the network. I am used to just putting my file on a USB stick and then transferring it to the other host. My Raspberry Pi was running Ubuntu server 22.04 LTS and is CLI only. So, I wanted to learn about file transfer over the network. I ended up on using the Secure File Copy protocol or SCP for short.
SCP is a method of sending files over the SSH protocol. It is an outdated protocol according to the developers of OpenSSH. They recommended the use of SFTP or rsync for file transfers. Since I was in a non-production environment and in my home lab, I figured it was ok to use! So, I decided that I would start a Wireshark capture on my host machine and then execute the transfer from my dev box to my RPI.
The Transfer
To execute the file transfer, we use the command syntax of:
scp {LocalSourceFilePath} {User}@{RemoteHost:Directory/TargetFile}I decided to execute with sudo, so I was prompted with my local sudo password and then I was prompted with the user password of the destination user. The transfer itself is nothing to write home about, it happened in the blink of an eye. It was simple 35-line python script and only 1663 Bytes!

I went back to my host and stopped the capture after the transfer was complete. Wireshark is a such an amazing tool for packet analysis, I would highly recommend learning how to effectively utilize this free tool and all its amazing features.
Analyzing the PCAP
One very cool feature with Wireshark is the ability to create a filter by TCP conversation. If you are not familiar with how TCP works, I would highly recommend looking into Chris Greer and his YouTube videos about learning Wireshark! I looked and found the initial packet for the transfer; this is the initial SYN packet from the source. Once you find that you can right click on that line item and select ‘Conversation Filter’ -> ‘TCP’. This will create a filter for just this TCP stream in the packet window.

My filter looked like this:
(ip.addr eq 10.0.31.125 and ip.addr eq 10.0.31.15) and (tcp.port eq 56228 and tcp.port eq 22)What I noticed was almost every packet from the source was being duplicated, see image below.
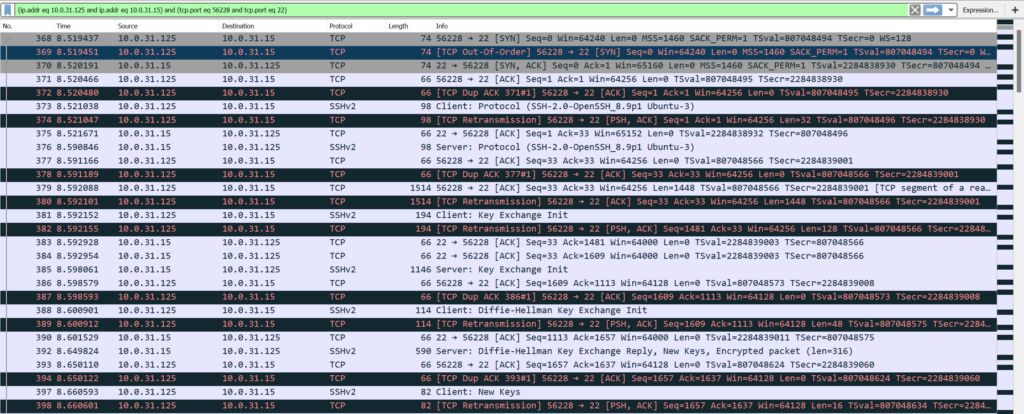
This did not seem like a normal operation for me. I decided to reach out to The Art of Network Engineering Discord server for some help identifying what could be going on. This is an amazing community that is full of folks wanting to help others learn and connect with like minded people. I got some direction from some more experienced folks and they suggested looking into the transfer directly on the source and destination and compare to the initial capture. Will I had never captured packets directly from the CLI or from a Linux host for that matter. So off to the web I went to identify how to execute this.
Capture from the CLI
I had never captured a packet from the CLI and needed to learn exactly how this was accomplished. Thankfully a quick search resulted in the use of the command tcpdump. The command syntax is:
sudo tcpdump -n -w {filename for capture} -I {interface name}My process was to repeat the same file transfer and capture packets directly on each device, then I would be able to compare that to my initial capture. So off to each device I went!

The Analysis
I was able to capture the transfer on each device and then copy that pcap file over to my host and examine with Wireshark. I would use the same filter by conversation technique described above. Once I was able to capture on each device and compare the packets, I was not seeing the duplicate packets from the initial capture. It is my determination that it was on oddity capturing on the host laptop and nothing to detrimental to my network.
Final Thoughts
This was a great learning experience for me and something that was very fun! This is why a home lab is so important to those just starting out or making a career transition. Getting in there and really understanding what is going on will make us better technicians. I wanted to get down to the packet level and understand what this protocol entailed. I was able to do that and a bit more!